Pocket home lab | Setting up remote access to your home lab
Remote access is a crucial aspect to consider when you setup your own infrastructure. You could have it sitting on the “edge” and be able to directly talk to it or use a secure VPN to have controlled access. Here, I have written about my experience with for setting remote access to my home lab with ZeroTier and possible alternatives ways one can approach the same scenario.
Home lab on the go
It is a common habit to have your own home lab among many professionals and enthusiasts in the IT field. Whether it is about hosting your content to serve the internet or tinkering with networks and applications, a home lab can be your workplace or your playground. There are different approaches to implementing a home lab depending on the resources available. Cloud platforms can be effortlessly used to create infrastructure virtually but costs increase relative to scale. Alternatively one can use accessible hardware to set up in an available physical location.
Cloud platforms provide easy methods to expose and define access controls to your assets that sits on the “edge”. When working with your own hardware however, you need to manually integrate your infrastructure with services like site-to-site VPNs or SD-WANs to achieve this goal. In addition, some external factors may affect your implementation. Such as Carrier-grade NAT (CGNAT) used by ISPs which doesn’t allow peer-to-peer connections. It is possible to allocate a public IP for your infrastructure, but there are alternative technologies that can help you to circumvent limitations of CGNAT.
This blog is about interconnecting the infrastructure, I won’t be covering how to start your own home lab from scratch. However, there are lots of resources to get started out there already. Also, huge kudos to @0xBEN for his resources that helped me get started with mine.
Connecting the nodes
My home lab layout is based on @0xBEN’s Proxmox VE guide (see references) which was used as the foundation for building my home lab, and therefore I will be quoting some content from his blog with his permission to demonstrate the network layout. Before continuing further, below diagram shows our home lab layout:

As of writing this blog post, my home lab layout is similar to what’s shown in the diagram except for the absence Wazuh SIEM and dedicated OpenVPN/WireGuard VMs. I added my own changes which I think is more suitable or interesting. There’s so many rabbit holes to go down and experiment on :D

My goal is simple, I need to be able to talk with the following 3 hosts in order to properly work with my home lab:
- Proxmox hypervisor: To manage the virtual infrastructure.
- Virtual pfSense firewall: In addition to firewall services, this is also used as a OpenVPN server to access VMs on
vmbr1(Security) vSwitch. Has access to home LAN. - A utility VM: Running bare-bones Arch Linux, my plan is to use this VM to host certain services that I may find useful (discussed later in this post). Has access to home LAN.
0xBEN’s guide demonstrate how dynamic DNS can be used to communicate with the lab remotely. But this was not the case for me due to CGNAT limitations on my ISP connection. Upon looking for alternatives, these are some solutions that I found popular (in no particular order) that I can use:
- ZeroTier
- Tailscale
- Defined Networking which uses Nebula and manages backbone infrastructure for individuals/organizations.
- Netmaker
These services have the same use case, being able to connect internal or non-internet-facing hosts over a virtual network for remote access, with each having a few different features with different underlying spec. These services provide a decent pricing plan with a generous free tier for individual and some services or their underlying frameworks are publicly available and can be self-hosted by capable individuals.
One more important point to highlight is that these services provide different synergies with other services/devices as well. For example, pfSense officially support Tailscale to bridge “sites” (subnets) together and likewise MikroTik’s RouterOS supports ZeroTier integration. This can help bridge private networks quick and easily without having to configure intermediate routing/service in between. However, for my first run I decided to use ZeroTier, and it has been pretty simple to get started and work with.
ZeroTier
ZeroTier combines the capabilities of VPN and SD-WAN to connect all kinds of end user devices to a single virtualized network. The virtual interface created by ZeroTier makes it feel like a regular LAN network where you can manage routes, assign IPs, define flow rules, etc. while providing end-to-end encryption to all traffic.
It is also an open source project (some actions falls under their business license) and the relay server implementation is publicly available for anyone to self-host their own instance. They also provide a development SDK (a socket library) in a few different programming languages that can be used create and connect embedded applications and systems over the virtual network.
If you want to read more and get started with deployment, make sure to read their documentation and knowledge base for guides and troubleshooting. Now, let’s go over the steps you need to set up a ZeroTier network.
- After signing up for an account, you will land on your account dashboard. This page gives you an overview of your active networks and total number of nodes/hosts connected. Clicking “Create a Network” will create a new network entry on the dashboard with a random name. To continue, click on the new record to open the network configuration page.

- There are subsections for help regarding each option you see in this configuration page. Make sure to refer that if you have any doubts about a component.
- The basic settings section can be used to customize the name, description and the level of access control of your network. Private mode creates an additional authorization step which has to be approved by a network administrator before a node is allowed to communicate with the network.

- The advanced settings section contains network related options that you can configure according to your needs.
- Managed Routes dialogue can be used to manually add routes through the connected nodes. Additional configuration on the target node is required to make this work.
- IPv4 Auto Assign dialogue lets you define a IPv4 private address range (RFC 1918) that will be used to automatically allocated addresses to connecting nodes. You may want to double-check your allocation with your LAN or other networks that might overlap and cause issues with routing.
- IPv6 Auto Assign dialogue works the same as IPv4.
- Multicast dialogue lets you configure multicast recipient limit and enable broadcast within the network.
- DNS dialogue lets you define an internal domain for the network and assign a DNS server node.
- Manually Add Member dialogue lets you authenticate a node before it joins a network (or to unban a previously banned node).


- Heading over to Members section after configuring your settings, you will see a message about adding new members. You should now download and install the client daemon on to the devices you need to connect to the network (You will need administrative privileges when working with ZeroTier client). Assuming you are on a Linux distribution, you can try the below command on your terminal to test the CLI tool:
1 | # To print help text |
1 | # To view your client info |
- The client info command returns your client ID and service status, client ID (or member ID) is used to uniquely identify nodes when adding/removing from the network. We should now join our node to the virtual network with the network ID that is shown in the dashboard or in the network management page.
1 | # To join a network |
1 | # To list active network status |
- Assuming you have chosen to keep the network private in the configuration stage, the status of the previous command will be “ACCESS DENIED” because you need to approve the node before it can start communicating over the network. Head over to the Members section we previously left before, you should now see a new record with the client ID of the node you are working with. Check the box on the “Auth” column to approve the node.

- If everything went accordingly, your node will be assigned an IP address from the range you previously configured. Use the
listnetworkcommand in the CLI tool to verify. The service also configures a virtual network interface for the node which you can see withip acommand.
You should now repeat above steps for the remaining hosts that you need on the network. The client daemon makes sure that every time a host reboots, the virtual interface will be brought back up again. All you need is to be able to connect and talk to ZeroTier or your own relay server over the internet, then you can just treat it like a usual LAN connection.
Virtual network overview

Going back to my home lab setup, I connected my Proxmox node, utility VM, my personal laptop and my mobile to the network. The remaining node is the pfSense firewall but the reason I cannot connect it is that it may cause issues with the firewall config and my lack of knowledge on the BSD ecosystem. Even though I have listed about how to forward these internal services, another approach would be to have the firewall connected directly connected with our SD-WAN solution, so we can directly bridge internal subnets via the firewall without any intermediate forwarding or other solutions (I included a few examples in a previous section).

I initially used the Proxmox node as a proxy (by using the ssh -R option to create a reverse socks proxy) to access pfSense web panel and its OpenVPN server. It is a working alternative, but the next section covers how forward proxies can be used AND how we can assign a verifiable domain with the help of certain project.
A forwarding proxy
At this point, my attention went towards Nginx as this is a perfect scenario to set it up on the utility VM. It can act as a reverse proxy to serve internal services or forward TCP/UDP connections to internal services.
This is when I found a nice video that covers Nginx proxy manager project which can streamline the usage of Nginx and easily assign a domain name with verifiable security (SSL) to sites even if they are not exposed to the internet. I recommend watching the video for detailed steps, and my changes to its configuration is listed below.
Nginx Proxy Manager
- For the domain, I have selected
comradenet.duckdns.org(that’s a pretty long domain name) and pointed the record at the ZeroTier assigned address172.27.10.11of the utility VM. - After setting up docker and docker-compose on the VM, I took the
docker-composefile in the quick setup page and added an extra mapping to port1194which is the default port for OpenVPN servers.
1 | version: '3.8' |
- After spinning up the container and going through the initial login setup, I created an SSL certificate as described in the video.

- Moving on to proxy host configuration, the process is same as seen in the video. After defining two subdomains for Proxmox and pfSense, the destination is pointed towards their LAN addresses. One additional detail is that we need to enable Websocket support on both proxy records for the web panels to work correctly (This is the case for Proxmox and pfSense web panels, other web services may differ).

- And finally, I defined a stream record to forward all incoming traffic on port
1194to the same port on pfSense firewall via the LAN. With that, I just need to define the target server on the OpenVPN client config as the utility VM and the proxy will forward the traffic to pfSense server. TCP forwarding is selected as the OpenVPN server is configured to use TCP instead of UDP.

And that’s the proxy manager configuration for my environment. You may need to define additional port mappings depending on what you are trying to set up forwarding. You are free to stop and scrap the container when you want to modify port mappings as all the data is stored in mounts as defined in the docker-compose file.
Make sure to properly organize mount folders on your docker host, so your configuration is not lost.
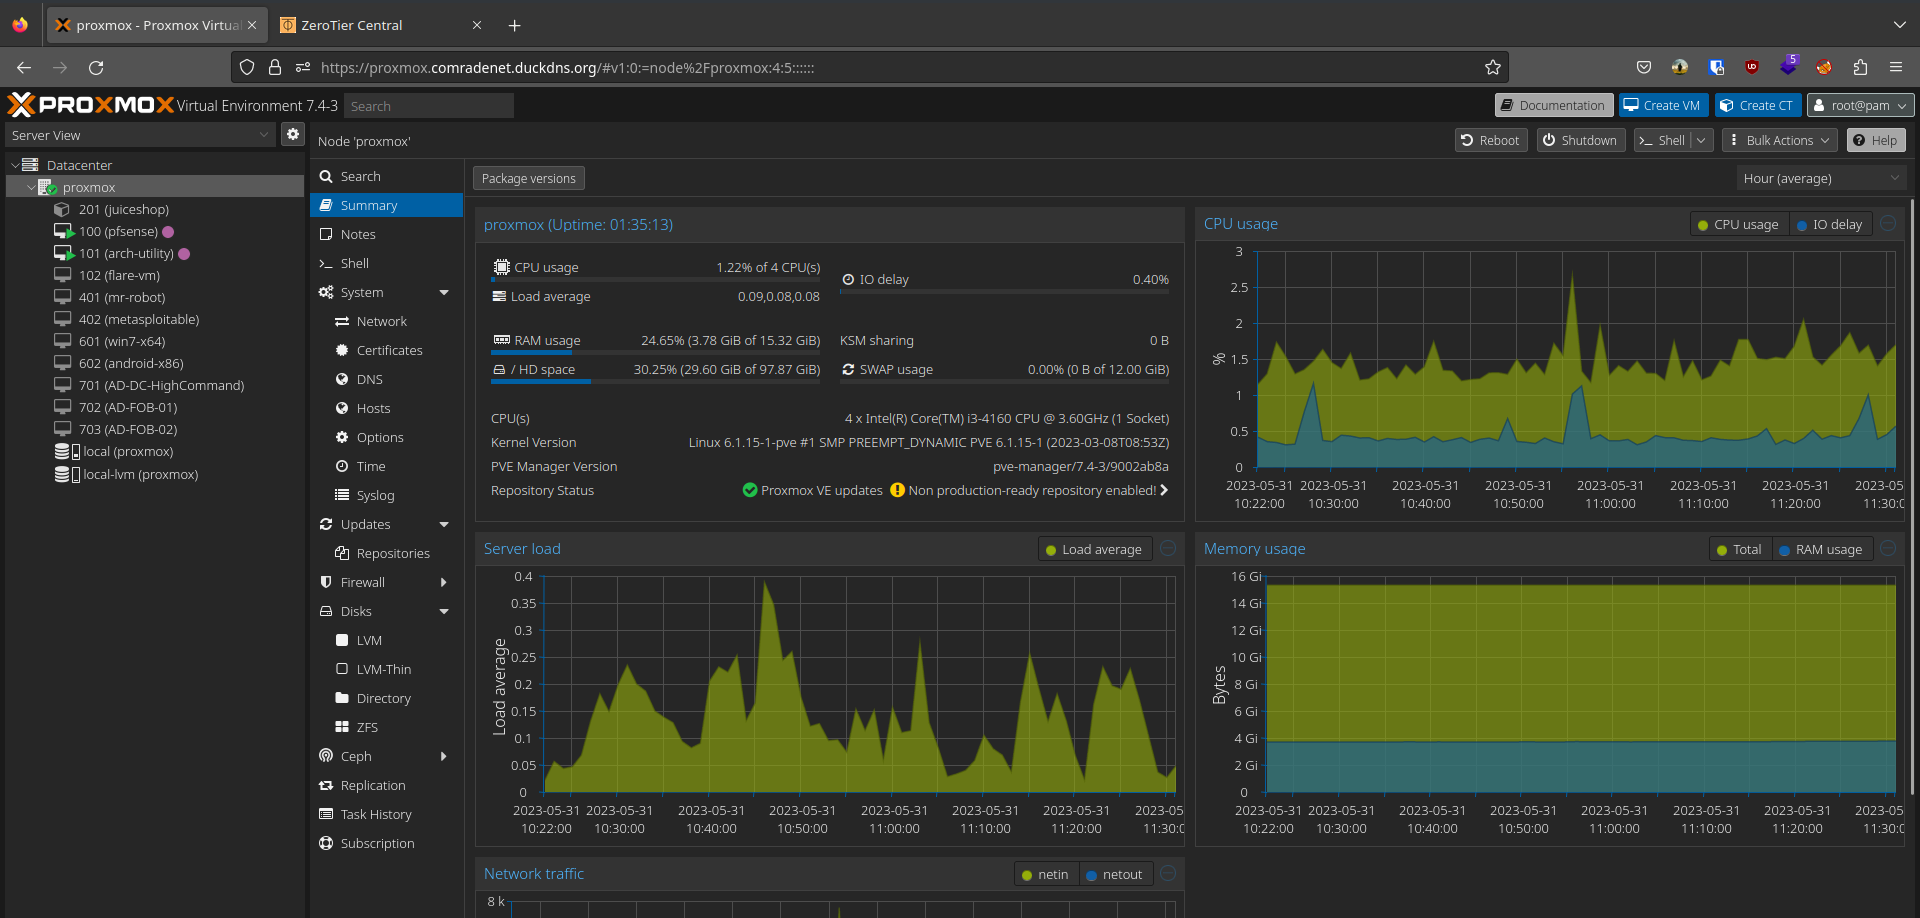
Proxy in action
Now I can easily access my web panels by using a nice little URL on my browser and join my internal VPN to play around with my cyber playground as long as I am connected to my ZeroTier network.


Nginx proxy manager has been pretty helpful to me as a beginner. The GUI has more options available inline with what Nginx has to offer, but one might need to manually configure their Nginx instance to fine tune all the options it has to offer.
Concluding thoughts
And that’s about it for this home lab adventure. This has been a nice learning experience for me when it comes to network implementation and technologies behind them. I am planning try out more services as listed in this post to come up with a better network design that is easy to use and maintain. The industry certainly has much more to offer, and this post only covered a few of them.
I would like to thank @0xBEN again for his awesome resources that got me interested in tinkering as well. And thank you for reading my post, hope you enjoyed and possibly gained something from my post.